2024 Rock Climbing Technique Bible: By Climbers For Climbers
Last Updated on: 23rd January 2024, 01:36 pm
Drop that knee, throw a heel hook, dyno for it! Sound familiar? You’ve probably heard a few of these terms tossed around at the gym or the crag, but if you’re new to the sport it might sound like a foreign language. All this lingo refers to climbing technique — and knowing how to execute them is essential to progressing as a climber.
If that sounds overwhelming, relax. Eventually the movement of climbing becomes so intuitive that you don’t even have to think about what to do, you just naturally end up doing it. But when starting off, it takes some practice to know what a climbing technique is, when to use it, and how to perform it.
Learning all these moves is journey, and this guide is meant to be a first step. We’re here to help you learn all the moves so when you’re on the wall, you’re ready to rock. Let’s dive in.
What is climbing beta
Climbing beta refers to advice or tips people give you for a particular route. This can include what type of move a certain section of a route requires, which holds to grab, or how to position your body.
Beta is the all encompassing term people use for advice on a wall. So if some is telling you to use a specific climbing technique, they are giving you beta. This is a helpful term to know for any climber – I guarantee at some point you’ll be asked if you want beta.
Keep in mind not every climber likes to get beta while they climb. For some a lot of the fun comes from figuring things out while they are climbing. So if you’re thinking about offering advice, best to wait until you are asked… you don’t want to be a beta sprayer.
Climbing techniques overview
There’s an endless number of tips and climbing techniques folk use out there. This guide is an overview of the main ones you’ll encounter as you start to develop your climbing skills. Keep in mind not every tip here is applicable to every style of climbing. Some are meant for specific styles like slab, crack, or overhung.
You never know what you’ll run into outdoors, so it’s good to have an arsenal of moves ready to help you conquer any crux. Alright, let’s get started.
Climbing techniques for legs
Ever heard people say climb with your feet first? Don’t worry, they are not implying you go upside-down (although a couple gnarly routes require that). What they mean is that you should get your feet into position before looking where your arms go. Your legs have more strength than your biceps, so it makes sense to ask them to do more work.
Because of that there are tons of climbing techniques for your legs. Mastering these and knowing when to use them will help push your grade and make you a silky smooth climber.
Drop Knee
A “drop knee” involves pivoting on your toe to twist your knee into a downward position. It is used to help climbers shift their weight, maintain balance, or grab a hold that is otherwise out of reach. It involves pivoting on your toe to twist your knee into a downward position
To perform a drop knee, begin with your body facing directly towards the wall. Pivot your heel away from your body and drop your knee in the opposite direction. This creates a twisting motion allowing you to shift your center of gravity to reach for holds or find a body position that takes less energy to maintain.
Flagging
Flagging is a technique in rock climbing that involves using your legs to create balance and counteract the pull of gravity. It allows climbers to maintain stability and control while reaching for holds or maneuvering through tricky sections. Imagine you’re on a route and feel as if you were to let go of a hand hold, your body would swing off the wall. As you search for a foot hold to balance yourself, you can’t find one. This is the right time to flag!
There are two ways to flag: a side flag and a rear flag. To side flag, position yourself near a hold or feature that allows you to extend one leg outward. With one foot on the wall or a foothold, extend the opposite leg straight out in the opposite direction and smear on the wall. This creates a counterbalance that helps to distribute your weight and stabilize your body. Use your arms and core to maintain tension and control throughout the movement.
Rear flagging is a bit tricker. In this example, let’s say your left foot is on a hold and you want to move right. Bring your right leg back across your body and press it to the wall. This will keep your body close to wall and let you get more power from your hips to reach up.
Heel Hook
A heel hook is a great rock climbing technique that involves utilizing the heel of your foot to grip a hold or feature. It’s common on all types of routes, but can be really useful in arete climbing or on overhangs. One of the best parts about a heel hook is that it turns rock features that wouldn’t normally make for good feet into bomber holds that can stabilize your whole body and generate tons of power. Another plus is they look pretty rad when you execute them.
Executing a heel hook is pretty simple. All you have to do is hook your heel into a hold, securing it in place with tension from your leg muscles. The next step from here all depends on the route and the hold you placed your heel hook in. If you’re hooked onto a ledge, sometimes you’ll end up rocking up onto your foot and transferring your weight. Other times you’ll just use the hook to move your hands or secure your other foot before making your next move up.
Knee Bar
A knee bar is a move where a climber wedges their knee into a crevice or feature on the wall to create tension. It allows climbers to offload weight from their arms and engage their legs where they often have more endurance and power. Knee bars are great tools for conserving energy and finding a rest when your arms start to get pumped.
To knee bar, you’ll need a crevice or feature that you can fit your knee into. Place your knee into the crevice, applying pressure until you are locked in and secured. Often times your whole leg will be involved with your foot on one side of the crevice and your knee on the other. Remember that knee bars can be uncomfortable… especially if you’re wearing shorts. Use the opportunity to get a good shake out, then continue up the route.
Smearing
Smearing is one of the most common climbing techniques out there. Almost every route uses it in some form, though slab climbing often relies on it as a staple of upward movement. All it takes is using the friction between your climbing shoes and the rock surface to create traction. Smearing is great when there are no obvious footholds, but you need more stability to make your next move.
To smear, simply place the side or sole of your climbing show on the rock and apply pressure. The rubber on your shoe and texture of the rock create strong enough contact that you can bump your hands or even get your opposite foot high.
On easier routes, smearing might make it easier to navigate to the big holds you’re looking for to ascend the route. On harder routes, smears might be the only option for feet — remember to trust that rubber!
Toe Hook
The toe hook is like the heel hooks cousin. Rather than using the heel, you use your toe to hook a hold, draw tension, and create stability to make your next move. The toe hook is a great climbing technique to prevent swinging and find the balance needed to link tricky moves.
To toe hook, start by positioning your body close to the wall with the your toe close to the target hold. Move your toe underneath or to the opposite side of the hold and flex your toes towards you. This will engage your leg muscles, create tension and secure the toe. Adjust your body position and foot angle to maximize stability and control.
Stemming
Stemming is climbing technique that involves using opposing forces between the hands and/or feet to maintain balance and stability on a wall. It is especially in dihedral climbing. By utilizing stemming, climbers can effectively distribute their weight and create stability, allowing them to move smoothly and efficiently.
To execute stemming, identify two opposing features on the wall, such as two bulges, two corners, or two cracks. Position your hands and/or feet on each feature, pushing against them to create tension and balance. Adjust your body position and the angle of your limbs to optimize stability and control. By actively pushing against the opposing forces, you can maintain balance and control your movement.
Stemming allows climbers to traverse sections with limited or no holds and ascend routes that require balance and body positioning. It enables climbers to “walk” up walls, using opposing forces to maintain a steady upward progression.
Climbing techniques for arms & hands
Right off the bat you’ll notice there are way more climbing techniques for feet than hands. The reason for that is contrary to what most people think, climbing is mostly your legs. You can get your power out of your legs, which is why there are more ways to utilize them.
With that said, hand placement is an essential part of climbing — and we have a few tips and tricks to level up your game.
Locking Off
Locking off is a handy climbing technique to help climbers get more power from crimps. We covered it in our article on sport climbing but it can be used anywhere.
When you are on a crimp, start by moving your thumb on top of your pointer finger. As you get ready to make your next move, press down with your thumb. This will help hold your hand in the crimping position and keep your body steady as you move for the next hold.
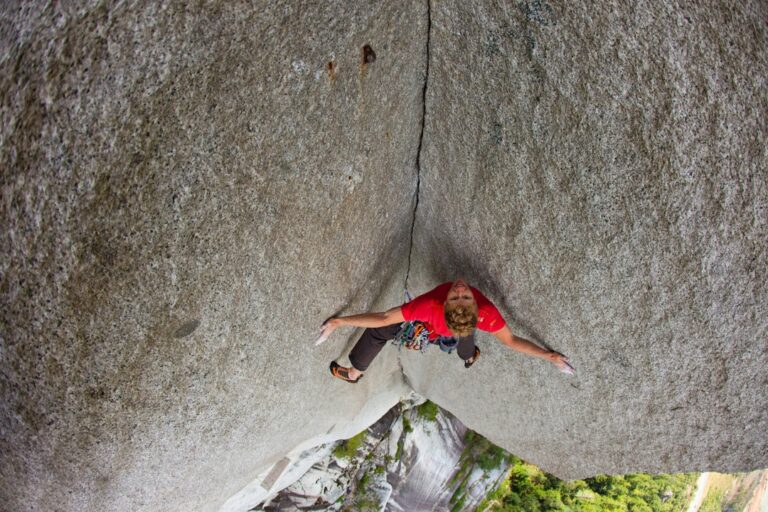
Hand Jam
The hand jam is a crucial climbing technique for crack climbing. It’s more common in trad climbing, but can be used on any route that has a crack. Hand jams work by wedging your hand into a crack or crevice for secure grip and stability. It is especially useful when cracks have sloped or rounded edged that don’t lend themselves as side-pulls.
To hand jam place your hand into a crack with fingers spread wide. Move your hand around until there is contact on each side of the crack. You can also make a fist to create tension if the size of the crack better suits your hand. Apply pressure to maintain contact and maximize the power you get.
Fair warning, hand jams CAN BE DANGEROUS. If you get your hand stuck and take a fall, it can result in a dislocated shoulder or other injury. While you want a good placement of your hand that creates pressure, you don’t want it to get stuck. When in doubt, default to safety and avoid the move.
Palm Press
The palm press is generally used on slab routes which are notorious for a lack of hand holds. It involves pressing your palm downward to use the angle of the rock to create tension. This mantle-like technique is great when there aren’t any clear places to grab.
Drop your arm down and place your palm hand on the rock with fingers spread. When you press down, you will create tension that can allow you to shift holds or get a high foot that can push you up to the next move. Pro-tip: having a little bend in your elbow will allow you to get you upward progress.
Climbing techniques for the whole body
Not every climbing technique relies on just hands or feet. Some require a synching of the two (plus your core and often every other part of your body) to execute properly. These are often some of the most useful and fun moves, asking climbers to hone their coordination, strength, and finesse.
Dyno
A “dyno” is an explosive and dynamic rock climbing move that involves launching yourself from one hold to another, often completely or partially detaching from the rock. It’s a powerful maneuver used to cover large distances and reach distant holds that are out of reach of static move. The dyno move adds an element of excitement and athleticism to climbing, allowing climbers to overcome obstacles and conquer demanding routes with style.
To execute a dyno, position your body with your feet firmly planted on the wall and your arms engaged. Crouch down on your legs so you can launch off them. In one explosive movement, push off with your legs and available arms and extend your arms toward the target hold. Maintain focus and control as you make contact with the hold and try to quickly reestablish your feet.
The dyno is a great climbing technique, but should be used as a last resort. It requires a lot of energy and often results in a fall when you can’t connect with your target hold.
Matching
Matching is a fundamental climbing technique most people do even if they don’t realize it. All matching means is changing one point of contact for another on the same hold. You can match on a large jug to move one hand higher. You can match feet on a ledge to keep stable as your reach for a higher foot. In more technical climbing, you might even match a hands and a feet on small holds when they are the only ones available.
Matching on large holds is easy, but when they get small it can be tricky. For hand matches, start by shifting your positioning to make room for your other hand. When both hands are on the hold slowly trade one for other grabbing as much of the hold as possible. Get the original hand to its next point of contact before readjusting the second hand on the hold.
Foot matching follows similar principles, but has a slightly different execution. Start by placing the foot you want to match next to the foot that’s on the hold. Slowly twist the foot off while you twist the other on. Often times beginners will do what’s known as bunny hopping — jumping off and quickly putting the other foot down. This increases your chances for falling by removing a point of contact and reducing the chances of a solid foot placement.
No-hands rest
The most relaxing of all any climbing technique is definitely the no-hands rest. As the name implies, this is a moment climbers can come completely relax their arms and recharge during a climb.
The trick to no-hands rests are knowing where to find them. Sometimes it is as easy as standing on a large ledge midway up a route. These are great, but fairly rare. More often, you will need to look for hidden opportunities. Stemming both feet out and leaning inward or utilizing knee bars are two climbing techniques that can create the right positioning for a no-hands rest, but beware. While your arms are recharging, your legs might be burning! Make sure to manage your pump carefully.
Wrap-up: Climbing technique
It takes time to understand each climbing technique and know how and when to put it into action. Whether you’re a beginner or a seasoned climber, these techniques will elevate your climbing experience and open doors to new possibilities.
So, grab your gear, gather your climbing buddies, and embark on an adventure of exploration and growth. The vertical world awaits, ready to be conquered by those who dare to push their limits. Embrace the thrill, embrace the techniques, and embrace the climber within you. Get out there and climb like never before!